
Personalized Introduction
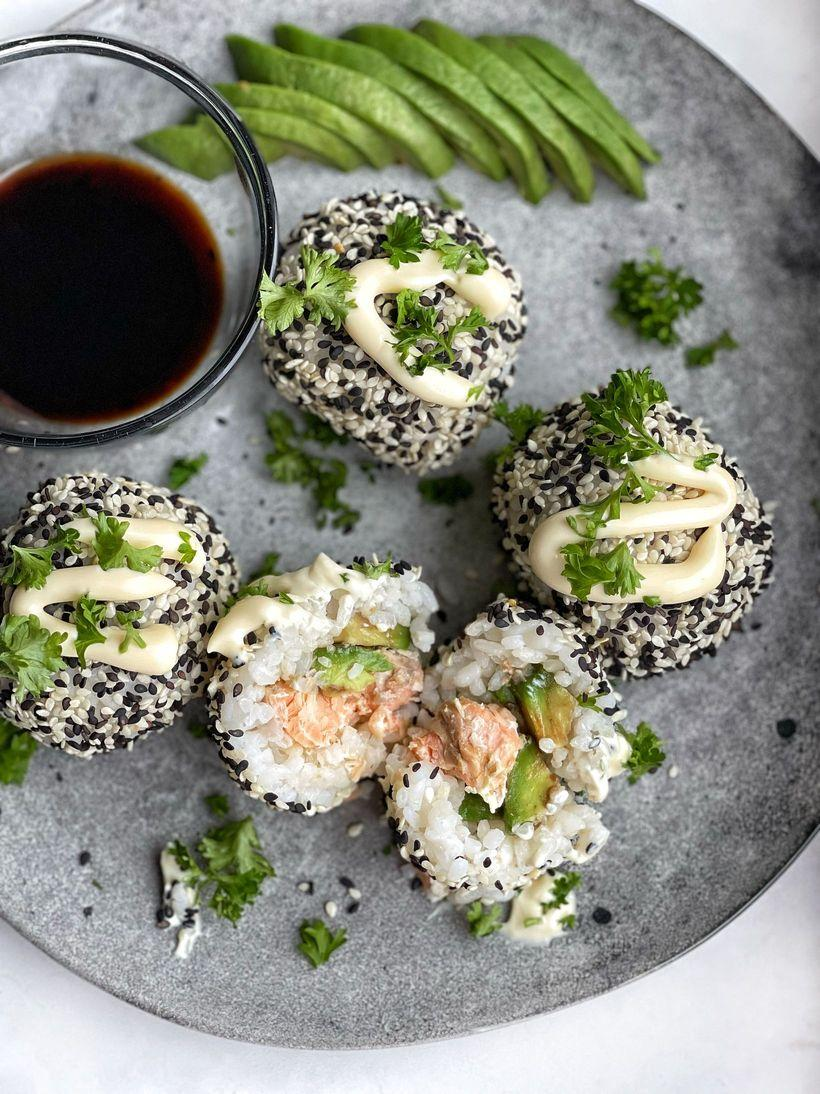
Some days I crave sushi, but I don’t always have the time—or the confidence—to roll perfect sushi rolls. That’s exactly why I love making these Easy Sushi Balls with Canned Tuna. They have all the delicious flavors of sushi in a much simpler form. Soft seasoned rice, a flavorful tuna filling, crispy nori, and your favorite toppings come together in a fun, handheld meal that’s perfect for lunch, meal prep, or a quick snack.
The first time I made sushi balls, I was surprised by how easy they were. There was no bamboo rolling mat, no complicated rolling technique, and no stress about making everything look perfect. I simply seasoned warm rice, prepared a creamy tuna filling, shaped everything into compact balls, and wrapped each one with a strip of nori. The result was just as satisfying as traditional sushi, with only a fraction of the effort.
One of my favorite things about this recipe is how budget-friendly it is. Canned tuna is affordable, easy to keep in the pantry, and packed with protein. Combined with rice and a few simple ingredients, it transforms into a delicious meal that tastes fresh and satisfying.
These sushi-inspired rice balls are also incredibly versatile. They’re perfect for school lunches, office meal prep, picnics, road trips, or light dinners. You can customize the filling with spicy mayo, avocado, cucumbers, or even cooked salmon to create endless variations.
If you’ve been wanting to make homemade sushi but felt intimidated, this easy recipe is the perfect place to start. It’s simple, delicious, and guaranteed to become one of your favorite quick lunches.
Recipe Origin & Story
Japanese rice balls, known as onigiri, have been enjoyed for centuries as a portable meal. Traditionally, they’re made with seasoned rice that’s shaped into triangles or balls and filled with ingredients like salted salmon, pickled plums, seaweed, or tuna. A strip of nori is often wrapped around the outside, making them easier to hold while adding extra flavor.
As sushi became popular around the world, many home cooks began creating sushi-inspired rice balls using familiar ingredients such as canned tuna, mayonnaise, cucumbers, and sesame seeds. These simple variations capture the delicious flavors of sushi without requiring advanced rolling techniques.
I first discovered tuna rice balls while searching for quick lunch ideas that were easy to prepare ahead of time. After making my first batch, I couldn’t believe how satisfying they were. Since then, they’ve become one of my favorite grab-and-go meals.
Today, I enjoy experimenting with different fillings and toppings, but the classic tuna version remains my favorite because it’s simple, affordable, and always delicious.
Ingredient Spotlight
- Main Star: Canned tuna provides lean protein and a rich, savory flavor that pairs perfectly with seasoned sushi rice.
- Secret Boost: Japanese mayonnaise adds extra creaminess and enhances the filling with its rich, slightly tangy flavor.
- Quality Tips: Use short-grain sushi rice for the best texture, high-quality canned tuna packed in water or oil, and crisp nori sheets for maximum freshness.
Nutritional Benefits
Canned tuna is an excellent source of lean protein, omega-3 fatty acids, vitamin D, and selenium. It’s an affordable pantry staple that makes healthy lunches quick and convenient.
Sushi rice provides carbohydrates that supply lasting energy, while nori contributes iodine, minerals, and antioxidants. Adding fresh vegetables like cucumber or avocado increases fiber, vitamins, and healthy fats.
Making sushi balls at home also allows you to control the amount of mayonnaise, sodium, and seasonings, creating a balanced meal that suits your preferences.
Adaptable Variations
- Dietary Swaps: Use light mayonnaise, gluten-free tamari instead of soy sauce, or mashed chickpeas for a vegetarian alternative.
- Flavor Twists: Add sriracha, kimchi, avocado, cream cheese, pickled ginger, chopped jalapeños, or furikake seasoning for exciting flavor combinations.
- Seasonal Spins: Include fresh mango during summer, roasted sweet potato in autumn, edamame in spring, or shredded carrots year-round for extra color and nutrition.
Cooking Science Explained
Short-grain sushi rice contains more starch than regular rice, making it naturally sticky enough to hold its shape without falling apart.
Seasoning the rice while it’s still warm helps the vinegar mixture absorb evenly, creating authentic sushi flavor throughout every bite.
Allowing the rice to cool slightly before shaping prevents it from sticking excessively to your hands while making the sushi balls easier to form.
Easy, Step-by-Step Recipe
Ingredients
- 2 cups cooked sushi rice
- 2 tablespoons rice vinegar
- 1 tablespoon sugar
- ½ teaspoon salt
- For the Tuna Filling:
- 1 (5-ounce) can tuna, drained
- 2 tablespoons Japanese mayonnaise (or regular mayonnaise)
- 1 teaspoon soy sauce
- 1 teaspoon sriracha (optional)
- 1 teaspoon sesame oil (optional)
- 1 tablespoon chopped green onions
- For Assembly:
- 2 nori sheets, cut into strips
- 1 tablespoon toasted sesame seeds
- Optional: sliced avocado, cucumber, or pickled ginger
Instructions
- Cook the sushi rice according to the package instructions.
- Mix the rice vinegar, sugar, and salt until dissolved.
- Fold the vinegar mixture gently into the warm rice.
- Allow the rice to cool until it’s comfortable to handle.
- In a bowl, combine the tuna, mayonnaise, soy sauce, sesame oil, sriracha, and green onions.
- Mix until creamy and evenly combined.
- Wet your hands lightly with water to prevent sticking.
- Scoop about ¼ cup of rice into your hand and flatten it gently.
- Place a spoonful of the tuna mixture in the center.
- Cover with a little more rice and gently shape into a ball or triangle.
- Wrap each sushi ball with a strip of nori.
- Sprinkle with toasted sesame seeds.
- Add avocado or cucumber if desired.
- Serve immediately or refrigerate until ready to enjoy.
Practical & Valuable Tips
- Storage: Store sushi balls in an airtight container in the refrigerator for up to 24 hours for the best texture.
- Serving Ideas: Pair with miso soup, edamame, cucumber salad, seaweed salad, or fresh fruit for a complete meal.
- Substitutions: Cooked salmon, crab sticks, shredded chicken, or spicy tofu all make delicious alternatives to tuna.
Make-Ahead & Batch-Cooking
These sushi balls are excellent for meal prep. Prepare the rice and tuna filling a day in advance, then assemble everything just before serving. This helps the rice maintain its soft texture while keeping the nori crisp.
For lunch boxes, wrap the nori separately and attach it just before eating. This prevents it from becoming soft during storage.
You can also prepare several fillings at once, allowing everyone in the family to customize their own sushi balls with their favorite ingredients.
Eco-Friendly Kitchen Hacks
- Use leftover cooked rice instead of making a fresh batch.
- Store extra rice in reusable containers for future lunches.
- Use leftover cucumber and avocado in salads or sandwiches.
- Buy tuna in recyclable cans whenever possible.
- Plan multiple meals using the same pantry ingredients to reduce food waste.
Pairing Suggestions
- Beverages: Green tea, jasmine tea, sparkling water with lime, iced matcha, or chilled barley tea pair beautifully with these sushi-inspired rice balls.
- Sides & Sauces: Miso soup, edamame, pickled vegetables, seaweed salad, cucumber salad, soy sauce, spicy mayo, or wasabi make delicious accompaniments.
Frequently Asked Questions
- Can I use regular rice instead of sushi rice?
You can, but short-grain sushi rice holds together much better and provides the classic chewy texture. - Can I make these ahead of time?
Yes! Assemble them a few hours in advance and keep them refrigerated until serving. - Can I use canned salmon instead of tuna?
Absolutely! Canned salmon works wonderfully and offers a slightly richer flavor. - Why are my sushi balls falling apart?
The rice may be too dry or not sticky enough. Be sure to use short-grain sushi rice and shape it gently while it’s still slightly warm.
Call to Action
These Easy Sushi Balls with Canned Tuna prove that homemade sushi-inspired meals don’t have to be difficult. They’re quick, affordable, packed with flavor, and perfect for busy lunches, meal prep, or light dinners. Once you make them, you’ll see just how fun and satisfying homemade sushi balls can be.
If you try this recipe, I’d love to hear how you customized it! Did you add avocado, spicy mayo, cucumber, or another favorite filling? Leave a comment below with your favorite combinations, and don’t forget to share your homemade sushi balls on social media. Happy cooking!
Bonus: Your Kitchen Notes
One of the best things about sushi balls is how easy they are to personalize. Maybe you prefer extra spicy tuna, crunchy vegetables, or different toppings like furikake or sesame seeds. Use this section to record your favorite ingredient combinations, shaping techniques, and serving ideas so you can recreate your perfect batch every time.
Simple recipes often become family favorites because they’re flexible and fun to make together. Continue experimenting with different fillings, sauces, vegetables, and seasonings until you’ve created your own signature sushi balls. Those little personal touches are what make homemade meals truly memorable.